I seem to be the face of ‘always a bridesmaid, never a bride’! Wedding’s are my favourite thing, getting to witness my bestie say her “I do’s” is something very close to my heart. But what I look forward to even more than the free food and hopefully the free booze, is the bachelorette party! A perfect excuse to the greatest girls night.!! champaign, dancing and all besties together, what could be more wonderful. Here are a few of my favourite budget Bachelorette DIY’s that I have made for previous bachelorettes. have another bachelorette coming up soon, so if you have any ideas please add them in the comments, or if you are wanting a little more detail on how to DIY your bachelorette party 🙂 DECORATIONS Photo bunting: print photos in black and white (I print from my at home printer on normal paper, but if you would prefer, an actual photo will do) place on cardboard and cut a V out of the photo, punch it and thread twine or ribbon through. hang!  Photos on balloons: Print photos and laminate, this will stop the photos from curling, if you dont have a laminator, place photo on cardboard to make it a bit more stable, punch a hole and tie to the end of a helium filled balloon. * this is great as a backdrop, and looks fantastic in photos 🙂 * Facebook is great place to get the photos (Obviously) and i always try stick to photos of the couple only, in a room full of girls, there will always be jealousy, you don’t want anyone to feel left out if there isn’t a photo of them.
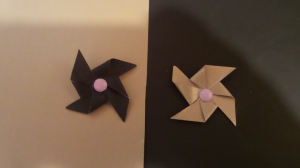
  CUPCAKE TOPPERS Pintrest is definitely the way to go if you looking for a low cost DIY cupcake topper, try searching “free printable cupcake topper”. Or lets get creative for second, like creative, not copy paste, creative! Pin wheels Pinwheels are the easiest to make, use plain paper, or scrap booking paper (i prefer scrap booking paper, it looks super fancy and comes in a wide range of designs) remember to stick to the colour theme, and also ALWAYS HAVE A COLOUR SCHEME. cut into a square – normally about the size of post it note, or into whatever size you going for, cut all corners going towards the middle (as attached) fold every other corner and stick together with either clue and a bead or a push pin, stick a toothpick through the hole and make sure the tooth pick is not noticeable from the front (Mine are the black and gold)
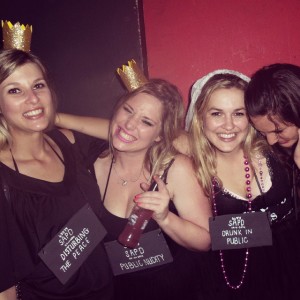
 Glittered Crowns I just discovered THE most incredible stuff EVER! It is a glittered A4 sheet of foam, the glitter does not come off, like if you had to make it yourself it would probably be all over your face and hands and all over everything. Cut these into 10cm strips, cut triangle into the top and staple the ends together, make holes and tie an elastic that would go around your head to hold in place (see pictures of ours attached) I got my glitter sheets from a local Distributor or craft shop – JA Florals in Port Elizabeth. These are great and everyone really enjoyed them, and they get to take them home for their “Dress up box” (We like having dress parties, I dont think we will ever grow up)
  * these glittered sheets can be used for everything – cut out hearts and stick them to a tooth pick and there you have cupcake toppers. Mugshot boards These are fantastic (Example in picture above) – they require a little more effort (doesnt look like much effort went into mine, but trust me a tried and it took me a whole day) I used card board boxes and cut them into roughly the same size (rectangle shape) painted back and front in chalk board paint. and wrote on them with typex – or a white Kokie may work too. make sure when you string them that they will not end up sitting above the boobs – that looks wierd and is not very comfortable when worn – and you also dont want them too long. measure them on yourself first. Kissing Canvas buy a canvas and make all the guests kiss the canvas and leave their “kiss” on the board. This is a great inexpensive gift for the bride to remember everyone that attended her special day.
  _____________________________________________________________________ I hope i was able to inspire you with some budget bachelorette DIY’s, this doesn’t have to cost you a fortune and there really is no reason to have a plain bachelorette 🙂 Enjoy the day and dont forget to have fun. LB XXX
Month: March 2015
How to clean your make up brushes
Washing your makeup brushes should be a regular part of your beauty routine. When you use your brushes, bits of makeup, oil, dirt, and even bacteria can get trapped in the bristles. So while it might seem basic, skipping this step can lead to clogged pores and pesky breakouts (and its actually quite gross). A good makeup brush doesn’t come cheap, so looking after them will lengthen their life span.
luckily cleaning your makeup brushes is easy, i like to rinse them at least once a week or every 2 weeks (note that the brushes will need a good few hours to dry completely, you do not want to use a wet brush, i would recommend cleaning after you have already applied you makeup for the day)
Here’s the right way to deep clean your makeup brushes…
You will need:
• A shallow bowl
• Gentle clarifying shampoo or baby shampoo
• Your sink
• A lint free cloth
Instructions:
- Begin by running your brushes under lukewarm water, rinsing out all of the residual makeup. Try to focus on the actual bristles while avoiding the part of the brush where handle meets the head, as this can loosen the glue over time
- Fill a bowl with lukewarm water and a squirt of shampoo, and gently swirl your brush tip in the water. If you need to, you can also swirl the brush in the palm of your hand to work up a lather.
- Rinse the brush tip under running water once again. Repeat steps two and three until the water runs clear from the brush,
- Use a cloth to wipe your brush clean, reshaping the bristles as you go.
- Lay your brushes flat on a cloth to dry.
- trim any runaway bristles or reshape the brush.
and BOOM, you have brushes that look and feel like new 🙂

